Neapolitan Pizza Dough
On January 10, 2024
This post may contain affiliate links. Please read our disclosure policy.
If you want a soft and chewy pizza crust with just the right amount of crisp and char, made with 4 simple ingredients, then you have to try my Neapolitan Pizza Dough. It’s the perfect base for everyone to create their own favorites.

Neapolitan Pizza Dough
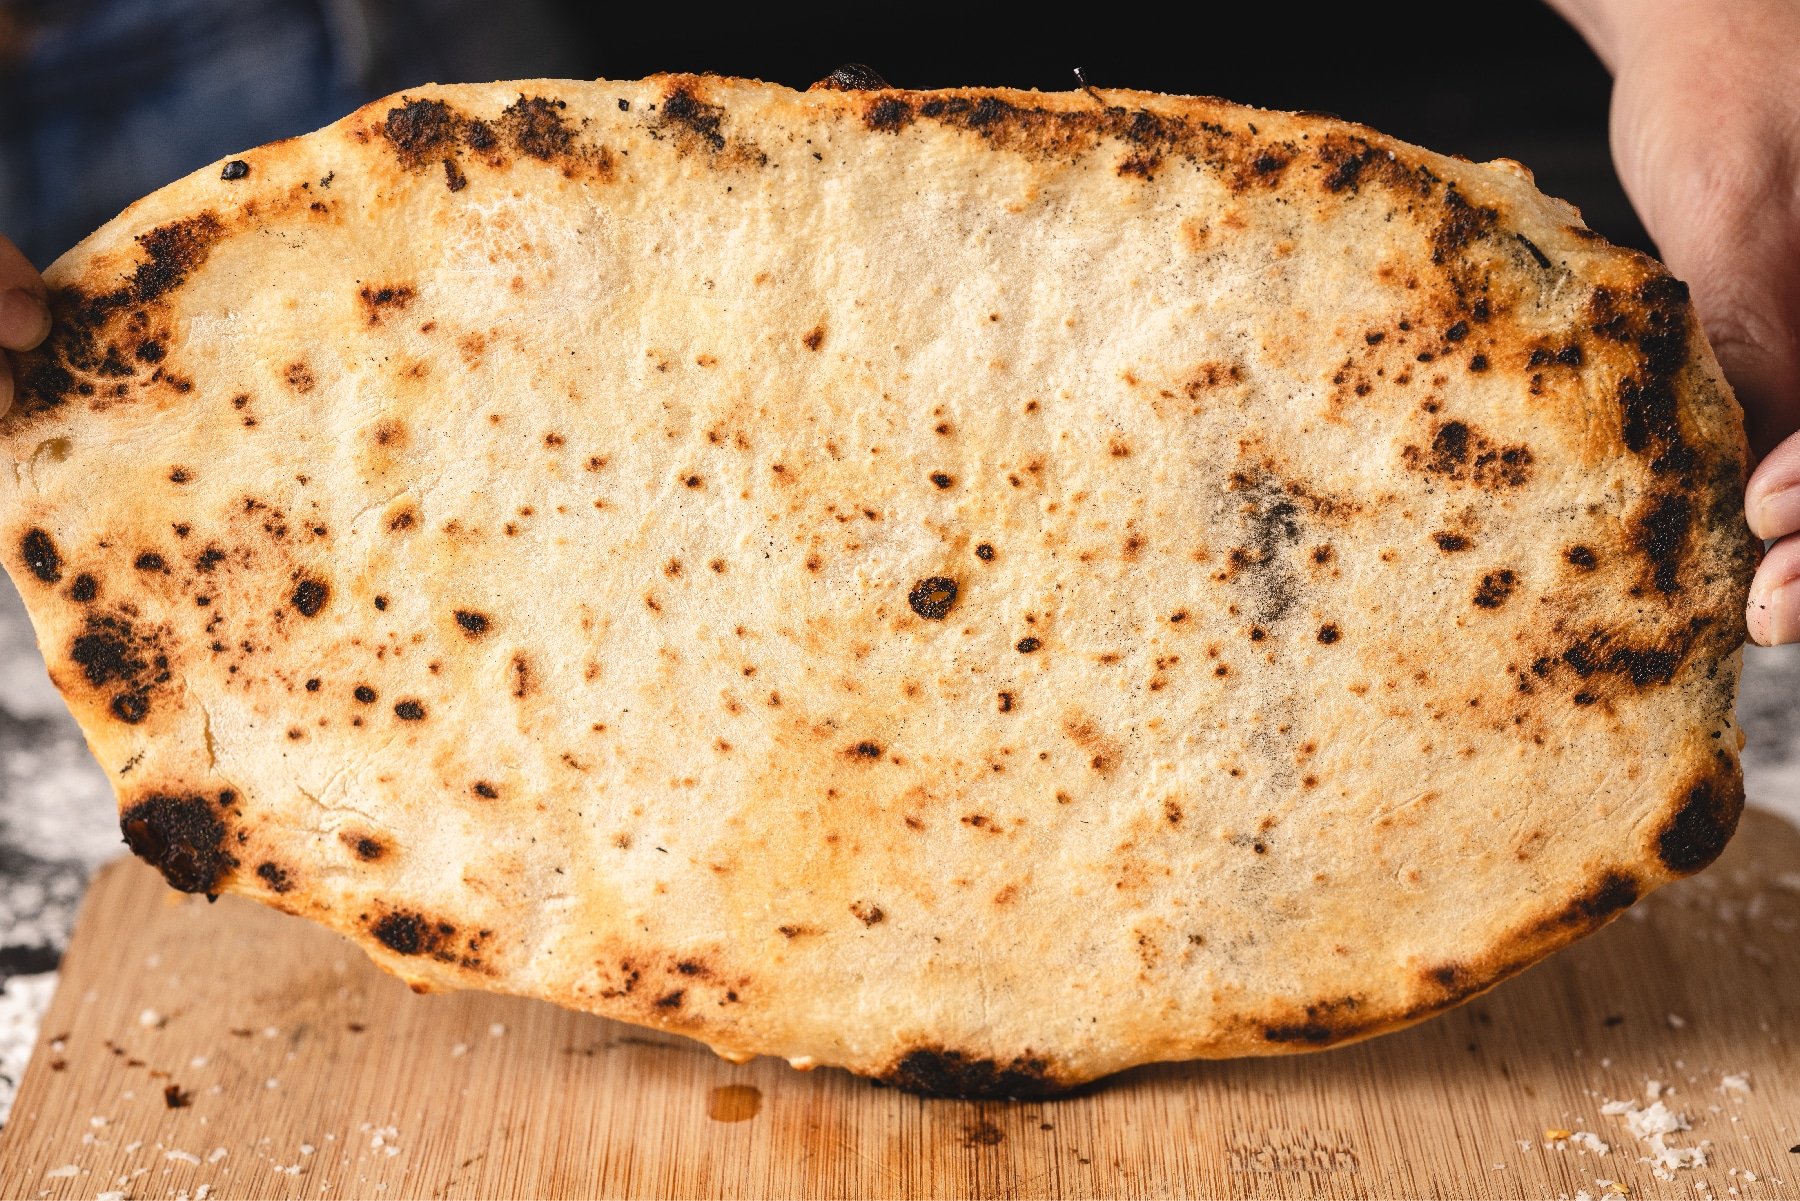
This Neapolitan Pizza Dough is going to elevate your wood-fired pizza game to a whole new level. To get an authentic Neapolitan pizza crust, your dough has got to be made of just 4 simple ingredients: flour, water, salt, and yeast. That’s exactly what I’m going to teach you how to make. You’re going to get a soft and delicious crust with crispy edges, and some amazing charred, leopard spotting just like you’d find in a real pizza joint. Top them any way you want, and enjoy the tastiest pizzas you’ve ever had. I recommend making extra because this stuff will get gobbled up fast.
The Best Flour for Dough
The key to making a great dough is starting with the right flour. There are a lot of different options out there, but when it comes to Neapolitan dough, type 00 is the only way to go. That’s because it’s got a high protein content and is ground down to a fine flour which cooks an amazing finished product. It gives your dough the ability to develop a nice crispy finish on the outside while remaining soft and chewy on the inside. I love using Tony Gemignani’s flour, but any type 00 will work.
You can get by using an all-purpose flour but it’s not going to bake as well with this style of pizza dough. You run the risk of your final crust being way more chewy than you want, and a lot less crispy and delicious on the outside. You’re also going to find it takes a lot longer to cook because of the additives in all-purpose flour. You’re already making your own pizza dough, I say spring for the good stuff.
How to Make Neapolitan Pizza Dough
- Flour. Pour 2 pounds of your type 00 additive-free flour into a large mixing bowl and then set aside. You want to combine the rest of your dough before bringing flour into the mix.
- Wet mix. In a separate bowl, pour in your water and then add your salt. Whisk the water until your salt dissolves. Hydration is key to getting bubbles for charring.
- More flour. Add a cup of flour to your wet mix and whisk until your wet mix is an even mixture. This step is super important because the flour is going to help preserve your yeast. Otherwise your yeast will die and your dough will never rise.
- Yeast. Once you’ve got the flour in your wet mix, go ahead and add in your yeast. Whisk again until everything is combined.
- Even more flour. It’s time to add your wet mixture to your bowl of flour. A whisk isn’t going to be enough at this point. You’ll want to use a scraper and mix everything together by hand until your dough is solid and slightly stringy.
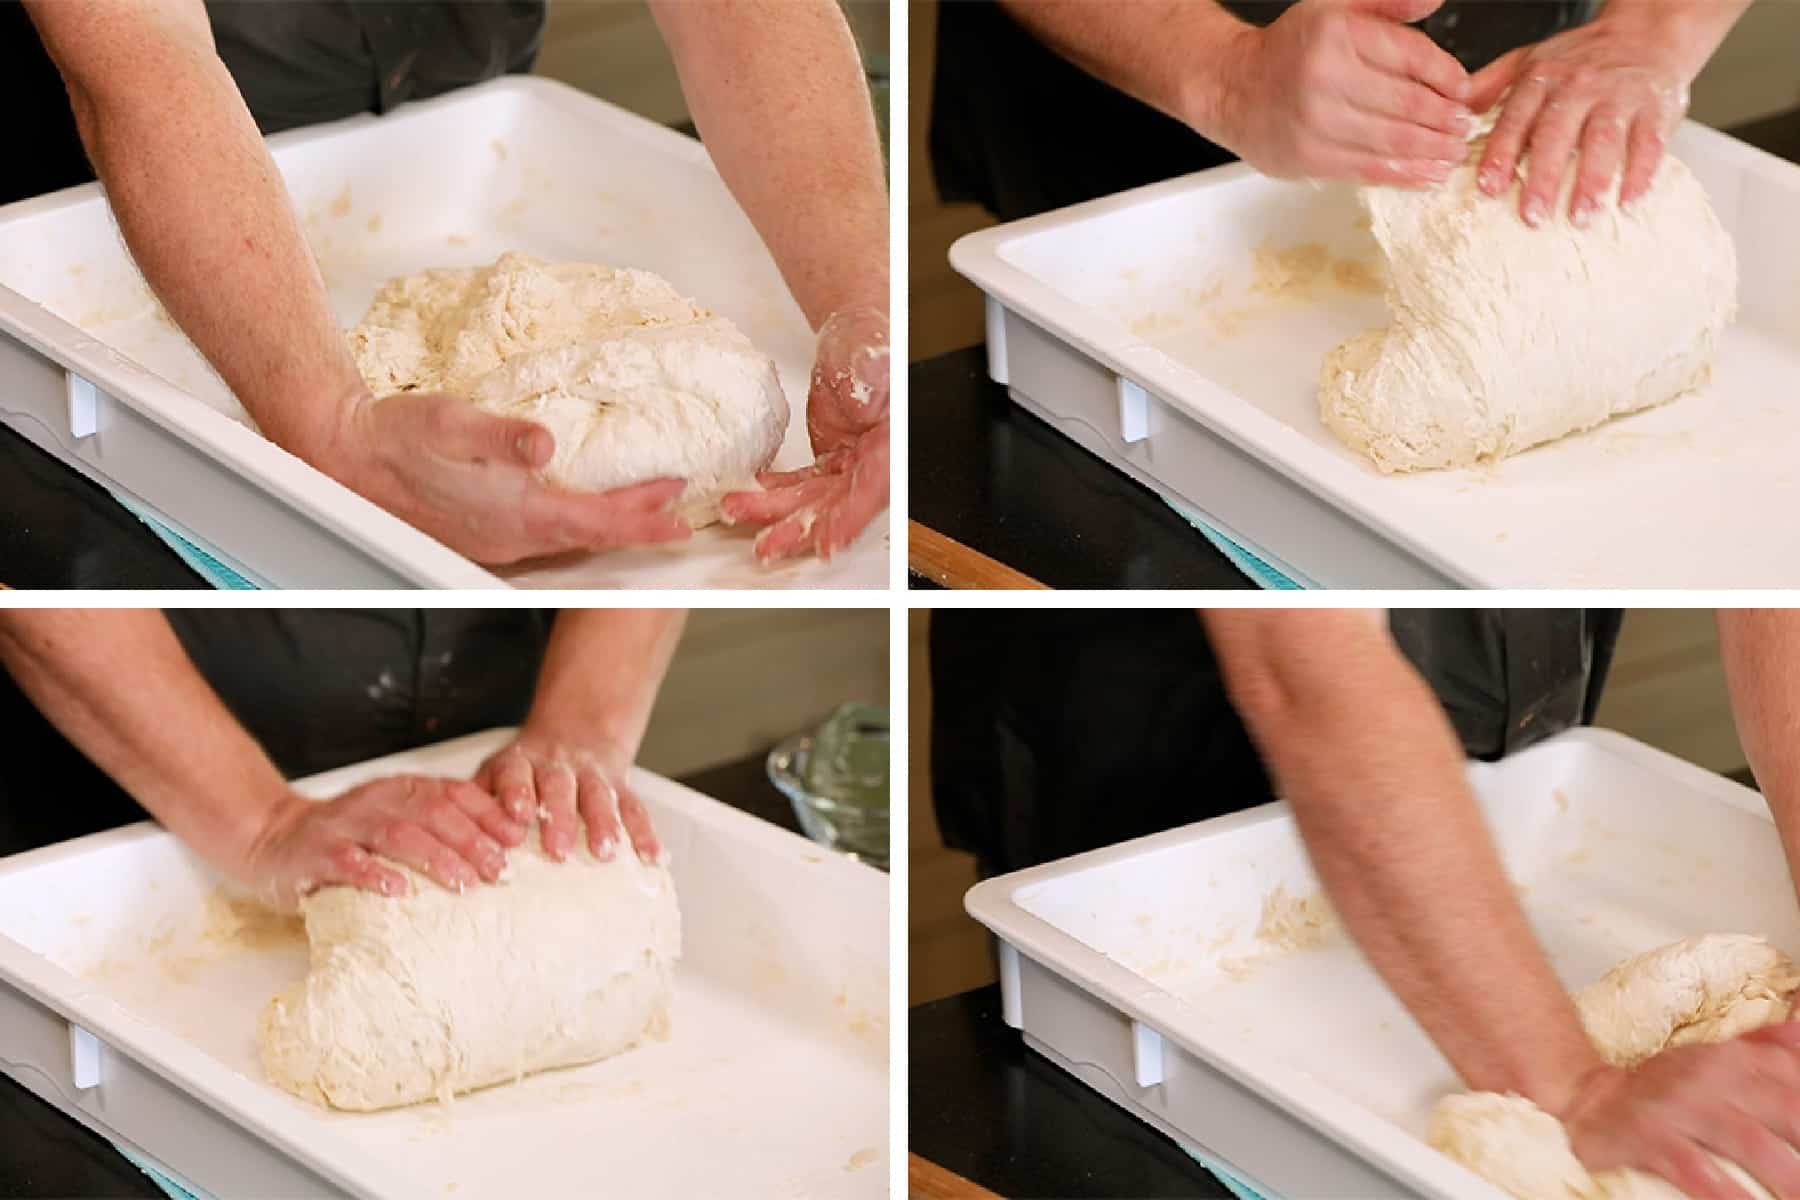
- Knead. Ready to work those kitchen muscles? You’re going to knead your dough for 15-20 minutes. I recommend using a dough box for this part, but you can do it on a clean, floured work surface as well. Knead until the consistency of the dough is slightly sticky and smooth texture. Refer to the picture below for a step-by-step guide to kneading your dough.
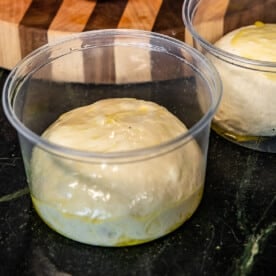
- Rest. When you’ve got your dough where you want it, you want to roll it into a large ball, coat with a little olive oil, place in a bowl, and cover it with a kitchen towel to rest for an hour. After that, you’ll be ready to move on to the fermentation process.
Fermenting Your Dough
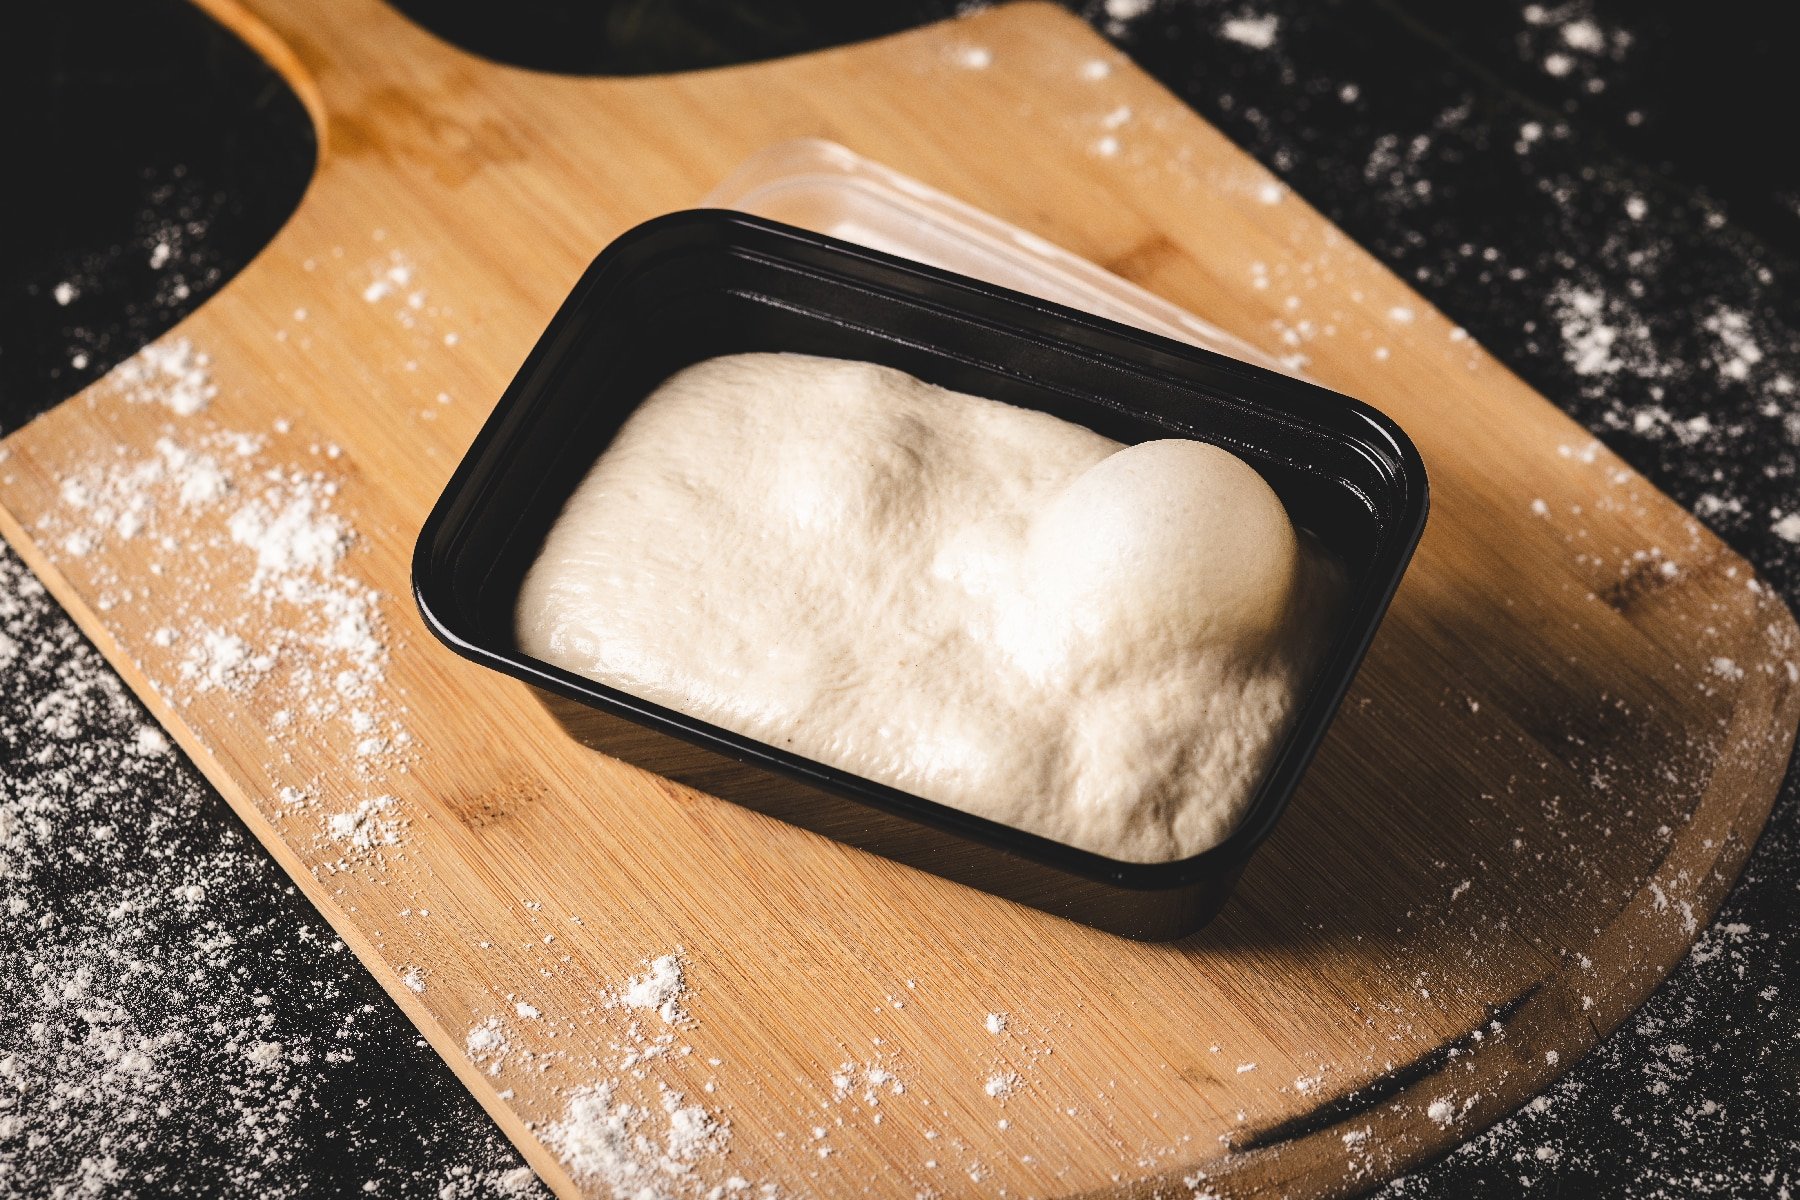
After you’ve allowed your dough to rest for an hour, it’s time to let it cold ferment. There are a lot of different ways to ferment, but a cold ferment is the best method for this dough. You’ll want to cut your dough into 8 ounce dough balls using a kitchen scale, coat them lightly with olive oil, and place them in your fridge to ferment. I prefer to store my dough balls in individual 16 oz deli or food prep containers. This allows the dough balls to expand and rise without drying out.
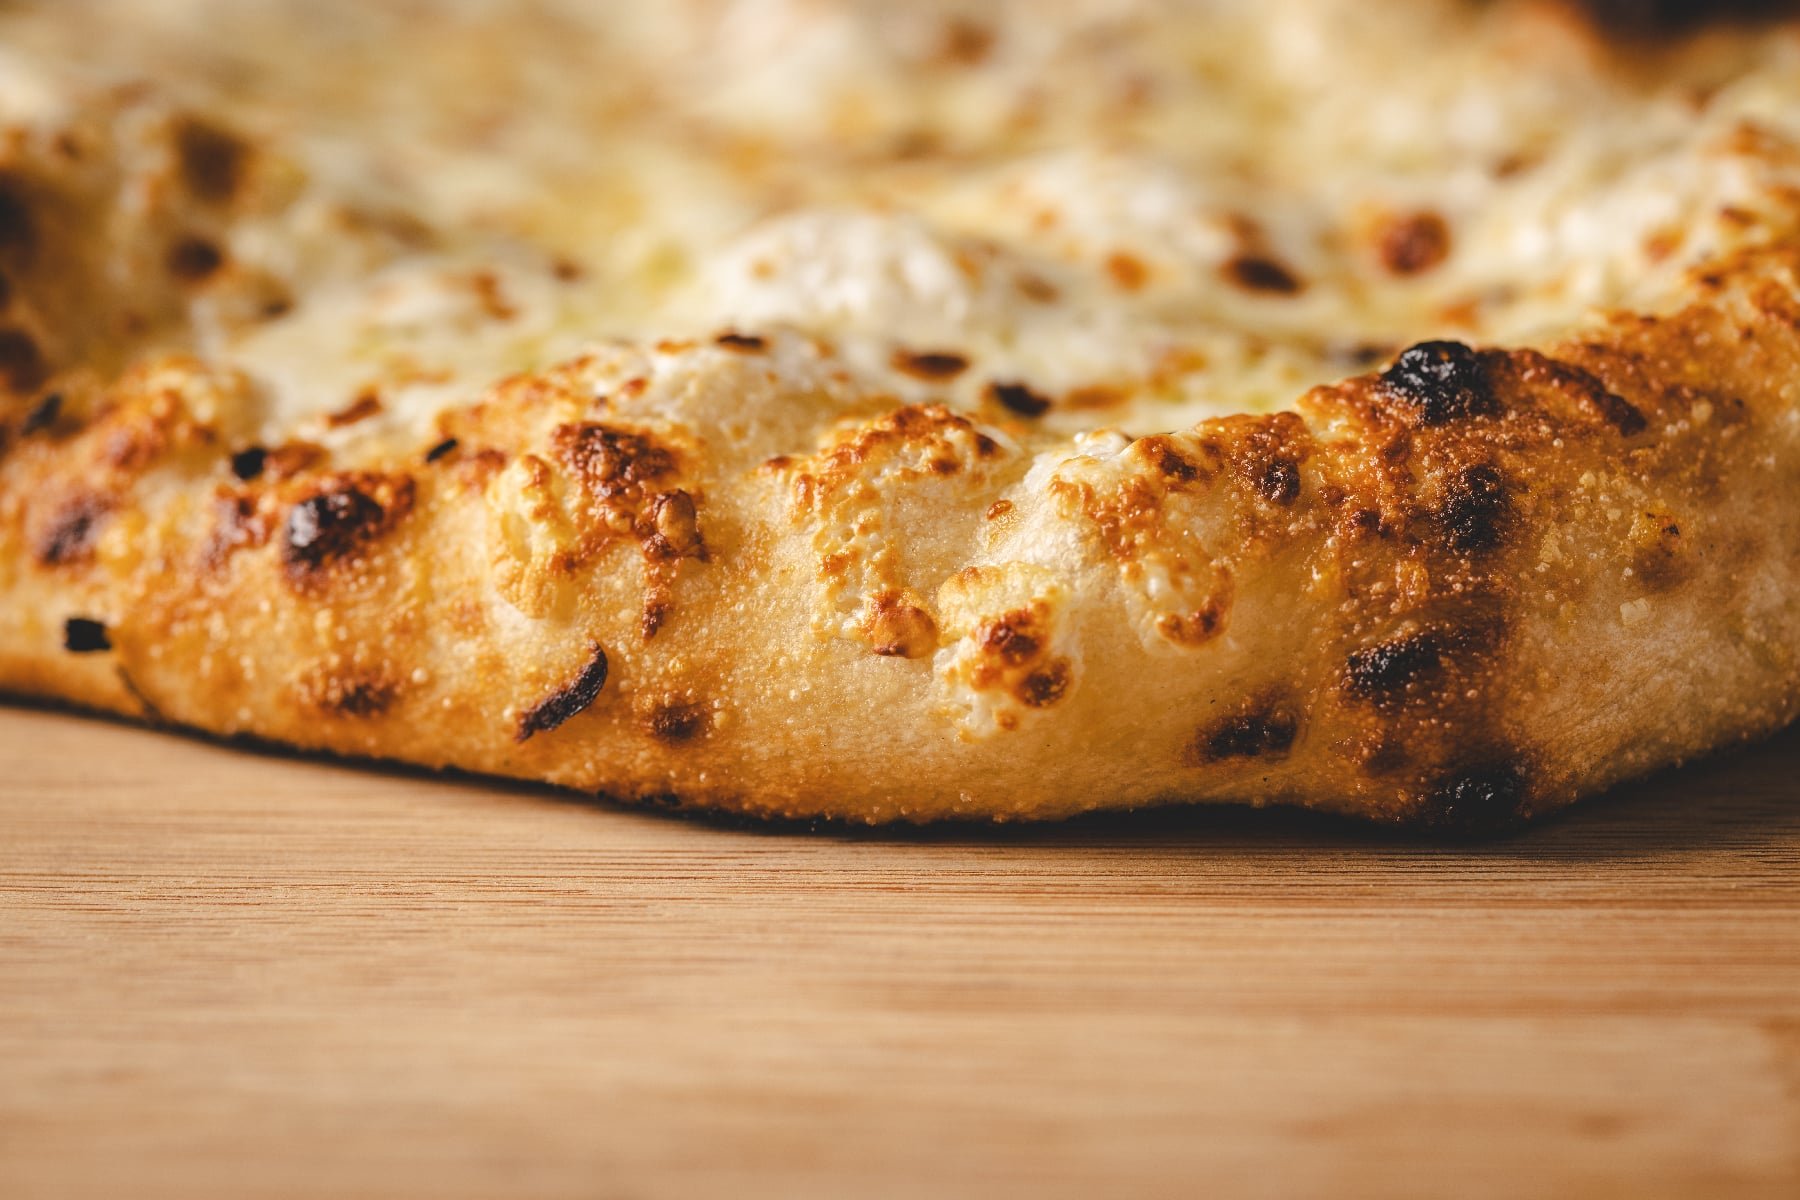
You want to give them at least 24 hours to ferment, but you can leave them for up to 72 hours. If you have the time, I highly recommend going longer. You’ll get a deeper, sourdough type flavor that is to die for. Plus, you develop more of those air bubbles, which is how you get that leopard spotting Neapolitan pizza is famous for.
Freezing Pizza Dough
You can make your dough ahead of time and store it in your freezer. Just do everything up to the fermenting process, and then place them in your freezer. The fermentation process will take place while your dough thaws. Simply allow your dough to thaw in your refrigerator for 24 hours and your dough will be ready to use. You might be tempted to freeze a lot because this recipe produces so much dough, but I promise this stuff is going to go quick once everyone starts firing their own pizzas.
Stretching Your Dough
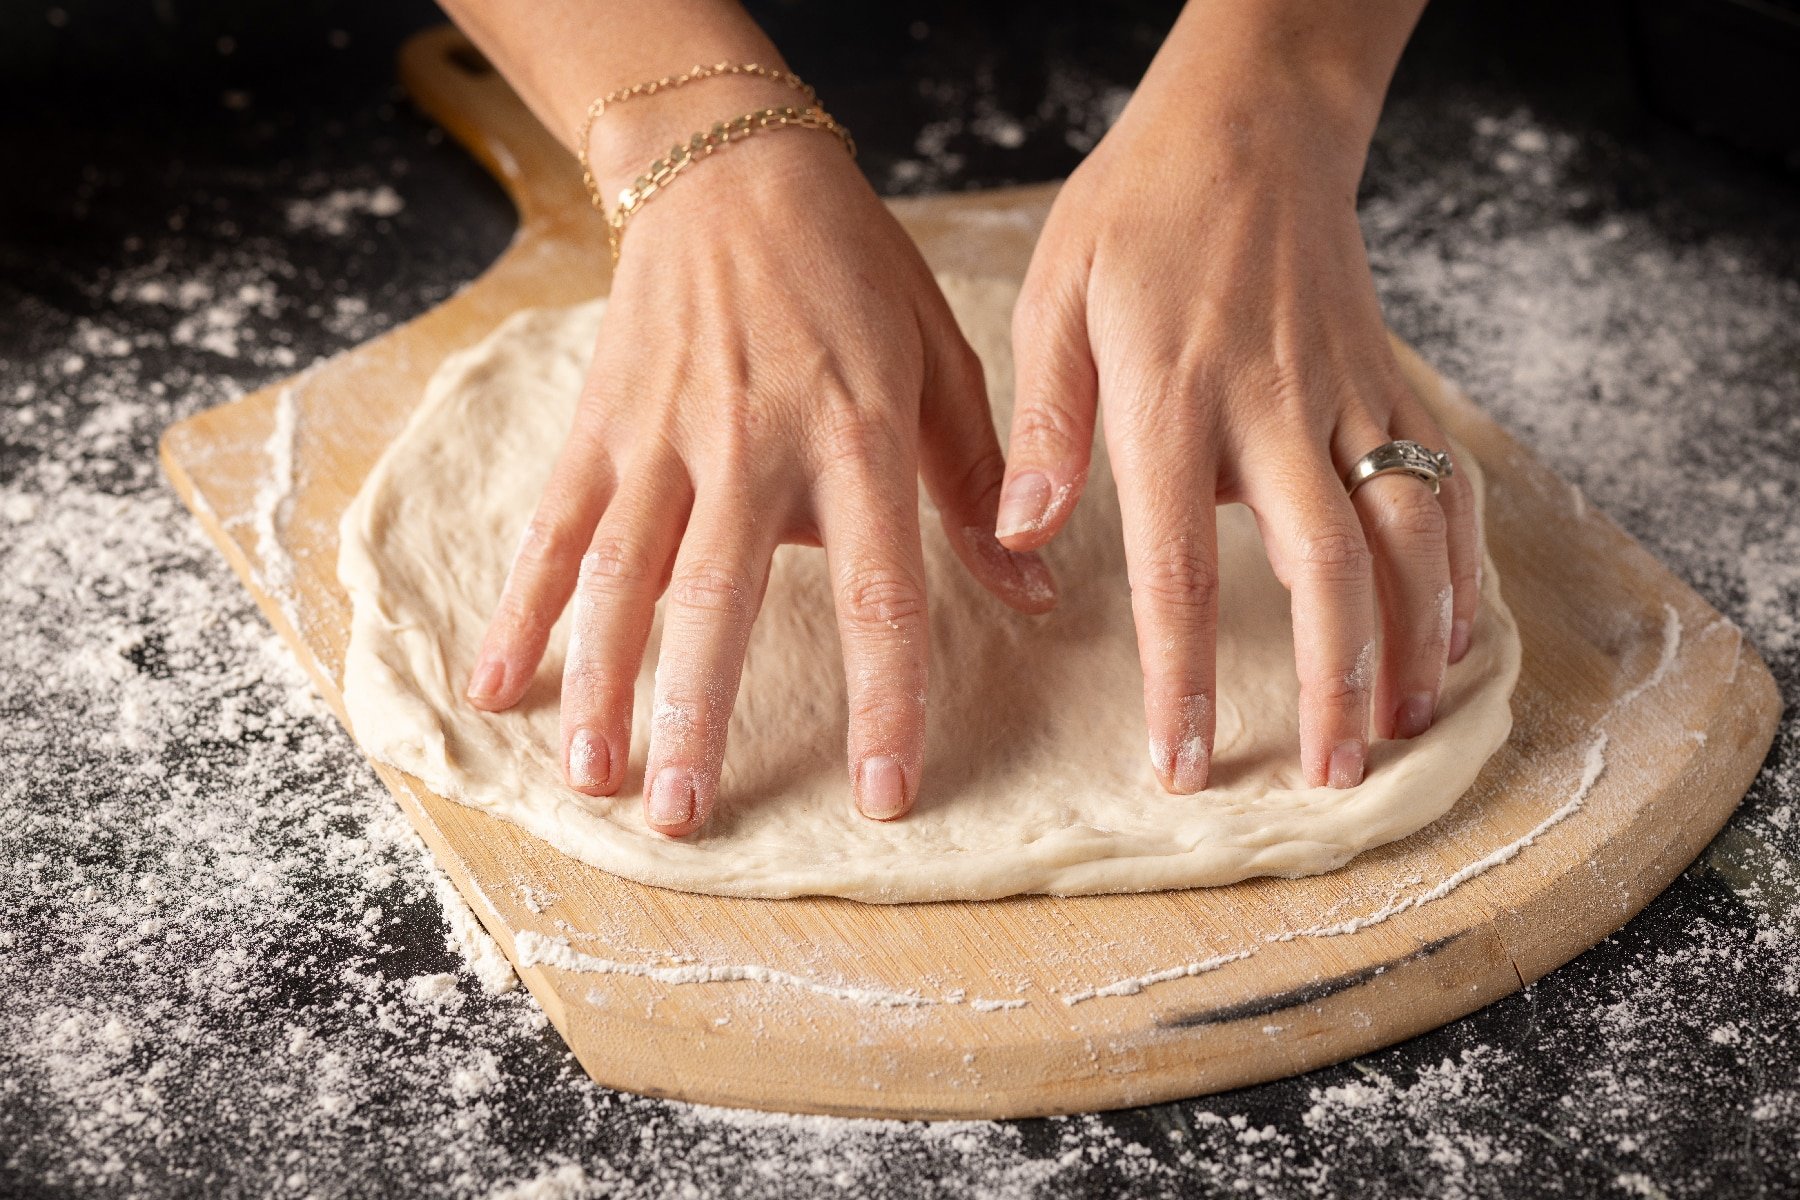
You’ve made your tasty dough, you’ve given it time to ferment and develop a great texture and deep flavors, now it’s time to stretch it like a true pizza pro. This is a very tacky dough, so make sure you’ve got a well-floured surface to work on. Remove your dough from its container and hold in your hands, letting it stretch on its own. Work it around in your hand until a nice circle forms. Place it on your floured pizza peel, and it’s ready for your sauce and favorite toppings.
Cooking This Dough
Once you’ve got your pizza oven up to temp and your pies are topped, you’re just a few minutes away from hot, crispy pizzas. Simply slide your pizza off the peel and onto your pizza stone. You’ll want to rotate it 90 degrees every 1-2 minutes, or once you start to see your dough rise and develop those coveted leopard spots. Once all the way around and you can pull your pizza to cool for a moment. Then cut into slices and devour it.
If you don’t have a pizza oven, don’t stress. This dough recipe will still cook tasty pizzas in a regular oven. Just set your oven to 400 degrees F and cook them for 10 minutes, or until the crust starts to brown and your cheese has melted to your liking. It won’t be quite as crispy, but you’ll still have yummy pizza from scratch. To increase the crispiness on oven pizzas, invest in a pizza stone. A stone holds the heat and pretty closely mimics the cooking experience in a dedicated pizza oven.
Pizza Recipes for This Dough
Hey Grill Hey is your one-stop pizza shop. Not only do I have a killer 4 Ingredient Pizza Sauce for you in the Hey Grill Hey app, I’ve also got several pizza recipes to help kickstart your imagination on the topping combinations you can create. Here are a few ideas to get you started, and they also work great with my Homemade Grilled Pizza Dough:
- Pear, Brie, and Prosciutto Dutch Oven.Pizza
- Red Pesto and Grilled Chicken Wood Fired Pizza
- Thai Grilled Chicken Pizza
Neapolitan Pizza Dough Recipe
Now that you have the perfect pizza base, you can host the next big pizza party. Tell me about the delicious topping combos you came up with for your pizzas in the comments below. Give this recipe 5 stars if you loved making it. To see all the latest recipes, BBQ tips and tricks, and behind-the-scenes fun, make sure you’re following us on YouTube, Instagram, and Facebook.
If you still can’t get enough pizza, head over to The Grill Squad to learn everything you’ll ever need to know to make perfect pizzas in your pizza oven from my friend and pizzaiolo Chef Jack Carlisle. He owned his own wood-fired pizza place for years, and he shares all the tips and tricks of the pizza game in this in-depth class.


Neapolitan Pizza Dough
Video
Ingredients
- 6.5 cups 00 flour 2 pounds
- 3 cups cold water 1.5 pounds
- 1.5 Tablespoons salt 0.6 ounces
- 4 teaspoons active dry yeast 0.4 ounces
Instructions
- Flour. Pour 2 pounds flour into a large mixing bowl and then set aside.6.5 cups 00 flour
- Wet mix. In a separate bowl, pour in your water and then add your salt. Whisk the water until your salt dissolves.3 cups cold water, 1.5 Tablespoons salt
- More flour. Add a cup of flour to your wet mix and whisk until your wet mix is an even mixture. DO NOT add yeast before completing this step.6.5 cups 00 flour
- Yeast. Add in your yeast and whisk until everything is combined.4 teaspoons active dry yeast
- Combine. Pour your wet mixture into your flour. Use a scraper to mix everything together until dough is solid and slightly stringy.
- Knead. Knead your dough for 15-20 minutes in dough box or on a clean surface.
- Rest. Roll dough into a ball and coat lightly with olive oil. Place in a clean bowl and cover with a kitchen towel or plastic wrap for 1 hour.
- Ferment. Uncover your dough and cut into 8 ounce balls. Lightly coat in olive oil and place in lidded deli containers. Place in refrigerator for 24-72 hours.
- Stretch, cook, and enjoy. Once your dough is fermented, stretch into a circle and place on pizza peel. Add your favorite toppings, fire your pizzas, and enjoy.
Nutrition
Nutrition information is automatically calculated, so should only be used as an approximation.


What size pizza does this make
We love this recipe and make it often. I just made a double batch but our plans changed and we won’t be able to use it all. Have you frozen this before??
Hi! I made this recipe and didn’t copy it at the time this summer and it was perfect. I made it tonight and it was too sticky. Has someone changed your recipe? I feel that I only used 2 C H2O last time. Thank you!
If you run into that, just add a little more flour until you get the desired consistency.
When ready to use your dough balls do you bring it back to room temp for a period of time or use straight from the fridge?
I would let them thaw in the fridge overnight.
Please fix your recipe. I had the same problem as many with wet dough because we used only 2 lbs of flour and used half of that for the wet mix. Afterwards, I saw that you answered one of the comments by saying there is actually 3 lbs of flour. If this is true, then the recipe should read 3lbs of flour divided. I also assumed based on the recipe that 6.5 cups equaled the 2 lbs, but maybe it equals 3lbs. Since I use a scale, I didn’t measure by cups. Haven’t made the pizzas yet, but looking forward to it.
Apologies, that comment was a typo and it’s been fixed.. It’s 2 pounds of flour, and the cup used in the wet mix comes from that. You may need to add more, or more water, depending on the thickness of your dough. You may have to experiment a bit to find what you like best.
How much water what temp
How much yeast
This is all in the recipe card at the bottom of the post.