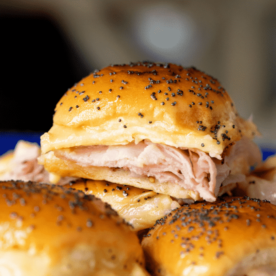
Grilled Ham and Cheese Sliders
On August 25, 2021
This post may contain affiliate links. Please read our disclosure policy.
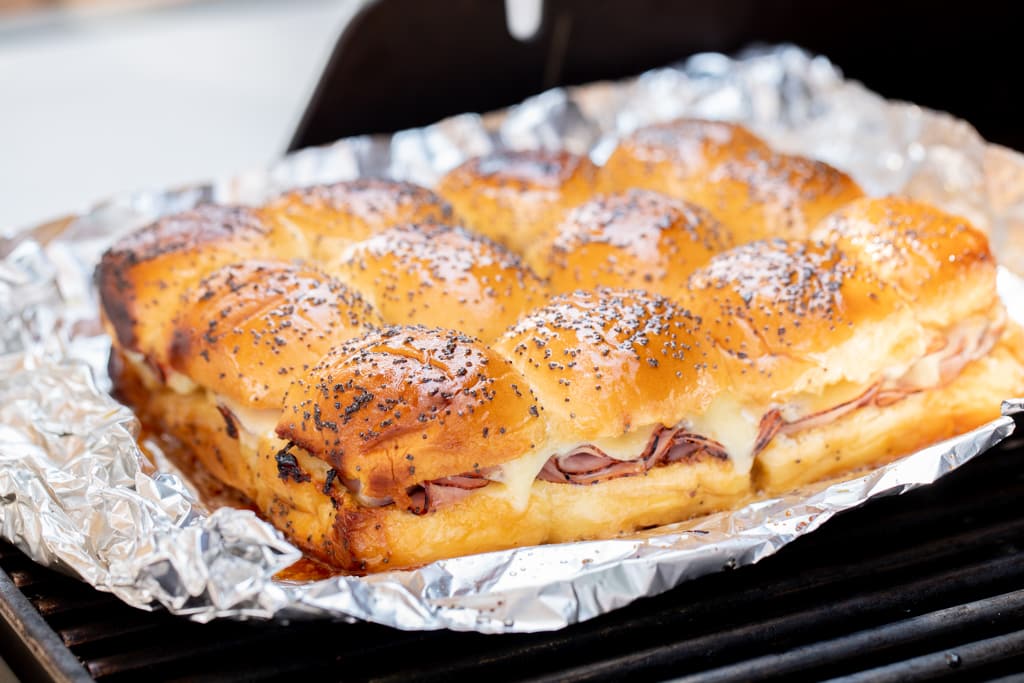
Classic ham and cheese sliders get a flavor upgrade with hot honey butter and a little bit of caramelized char from the grill. All of that ham and cheesy goodness gets hot and melty on the grill with no mess and easy clean-up, thanks to Reynolds Wrap® Non-Stick Foil. #sponsored
Ingredients for Ham and Cheese Sliders
Ham and cheese sliders are notoriously simple, and I wanted to keep all of the ease of the classic with new flavors that would have your family scrambling to grab seconds. Below are the ingredients I used in my sliders, with full quantities for everything in the printable recipe card. If you are feeling adventurous, swap out the meats and cheeses to switch up the flavors in your slider. The grilled slider possibilities are endless!
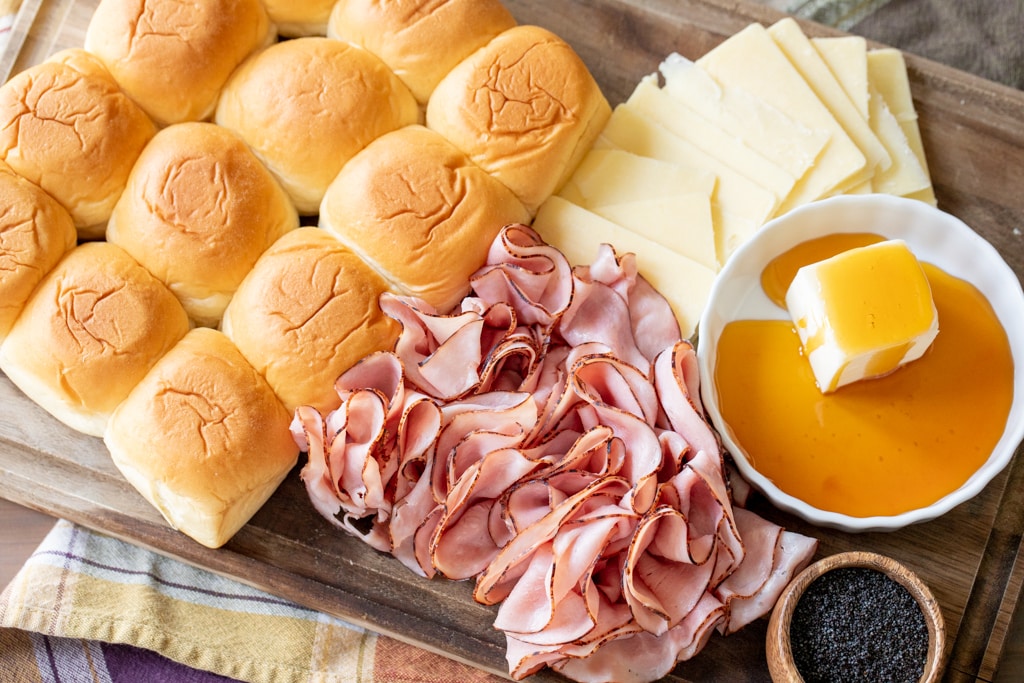
- Hawaiian Rolls. These are typically found on an end cap in the grocery store. I buy the 12 packs for my family of 5, but they do come in 18 and 24 packs if you’ve got a larger crew. You want to make sure you get the sweet Hawaiian-style rolls that are all baked together in one sheet where the edges of each roll touch each other.
- Thinly sliced deli ham. You can buy a honey ham here, but we are going to be adding honey later and I didn’t want things too sweet. I like a nice black forest or even uncured ham to add some nice saltiness to the sliders.
- Sharp white cheddar. I actually sliced my own cheese off of the block. I find it melts better than the pre-sliced cheeses. Medium cheddar is also great here if you don’t love a strong, punchy cheese.
- Whole grain mustard. We are mustard fanatics, so we go heavy on the mustard. This is something you can leave out entirely if you’re not a fan.
- Honey. I went a little crazy here and used a hot honey (basically honey with chilis) that is readily available on grocery store shelves. That tiny kiss of heat brought some real magic to the sliders and I highly recommend grabbing some! If you are spice averse, regular honey works just as well!
- Salted butter. Butter makes everything better, and that is certainly true for these sliders. Melting the butter with the honey and brushing the tops of the sliders makes for a sweet and caramelized topping and the best edges ever when these are cooked on the grill.
- Poppy seeds. Just a little kiss of color, a light nutty flavor, and an awesome pop of texture on top of the sliders.
- Reynolds Wrap® Non-Stick Foil. None of the cheese or rolls stick so you can easily place it on the grill, and clean-up is a breeze. They also have a new tab on the box that makes it really easy to open and close.

Assembling the Sliders
My favorite part of making these sliders is the ease of basically making a dozen sandwiches at once.
- Using a long bread knife, slice the rolls apart to separate the tops and the bottoms. Since we are using the rolls that are all baked together, the top half of the rolls should all stay in one piece. Set that aside.
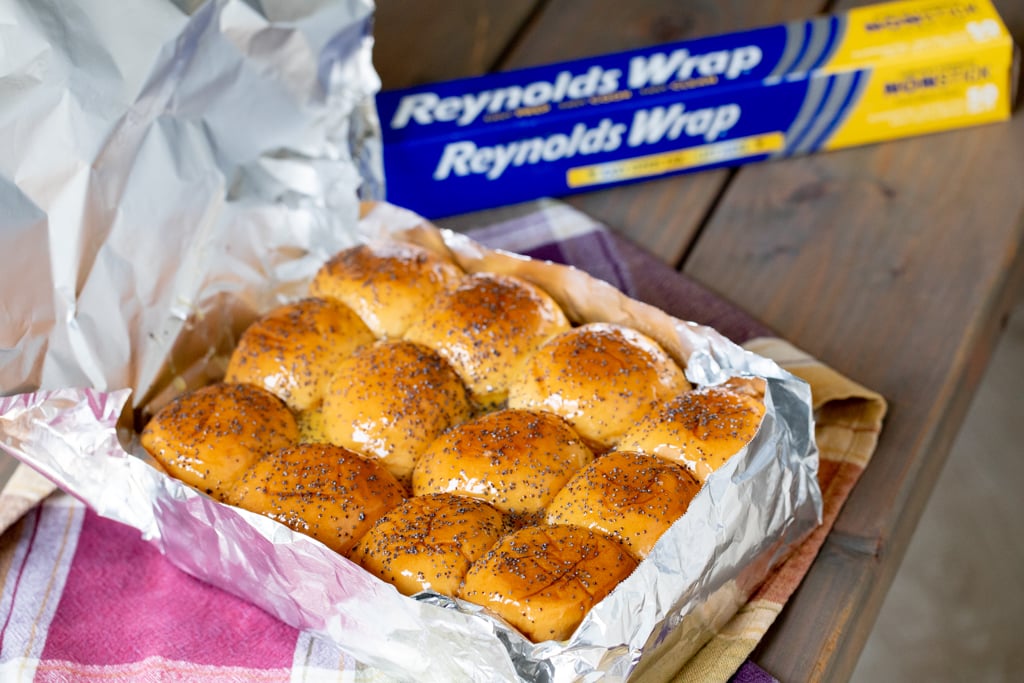
- With the dull side facing up (that’s the non-stick side), place the bottom of your rolls on a long sheet of Reynolds Wrap Non-Stick Foil. Spread the bottom side of the rolls with whole grain mustard.
- Layer on the toppings. Start with the ham and then the slices of cheese. Fold up the ham as you place it on the bread so you get nice layers of deli meat. Shingle the cheese on so the edges slightly overlap and you’ve got nice coverage. Place the tops of the buns back on the meat and cheese stack.
- Melt the butter and then stir in your honey. Brush the honey butter across the tops of the buns, letting it drip down the edges and in between the cracks of the buns. Sprinkle the tops with poppy seeds.
- Fold the top layer of foil over the buns and crimp the edges to create a sealed foil pouch.
How to Cook Ham and Cheese Sliders on the Grill
Once your sliders are assembled, it’s time to grill! You’ll want to utilize indirect heat on your grill to cook the sliders through without burning the bottoms of the buns before the cheese is melted. If you’re cooking on a gas grill or a charcoal grill, follow my instructions for setting your grill up for two-zone cooking. If you’re doing these on a pellet grill, you’re already set up for indirect grilling.
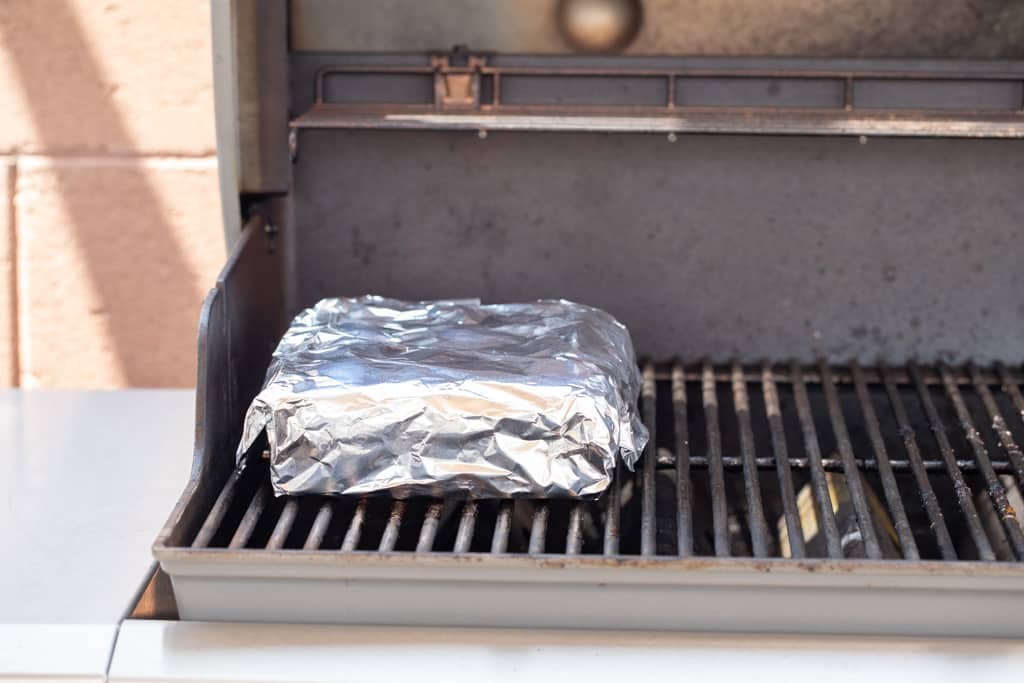
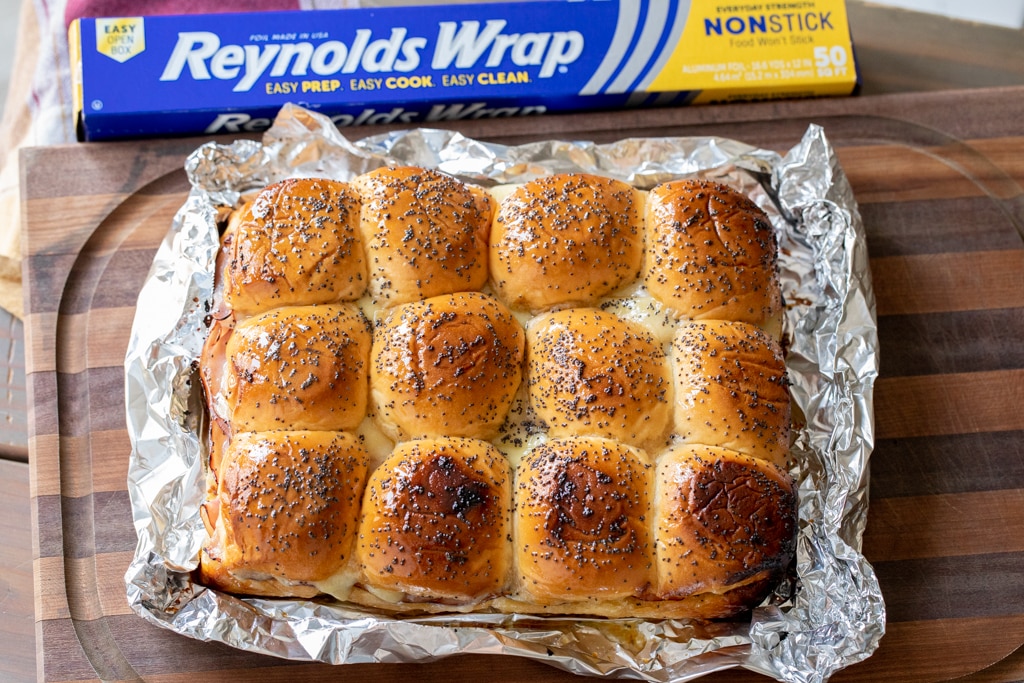
You want the overall temperature of your grill to be around 350 degrees F. Place your prepared and foil-wrapped sliders on the indirect heat side of the grill, close the lid, and cook for about 20 minutes. Open the foil packet with the sliders inside, close the lid on the grill again, and let the tops of those buns toast for about 5 more minutes. Your buns should be toasty, the edges should be bubbly from the melted honey butter, and the cheese should be starting to drip nicely down the sides of the sandwiches. YUM!
Grilled Ham and Cheese Slider Recipe

Grilled Ham and Cheese Sliders
Video
Equipment
- Reynold's Wrap® Non-Stick Foil
Ingredients
- 12 Hawaiian Sweet Rolls
- 3 Tablespoons whole grain mustard
- 8 ounces deli sliced ham thinly sliced
- 6 ounces sharp white cheddar cheese sliced
- 3 Tablespoons salted butter
- 3 Tablespoons hot honey
- 1 teaspoon poppy seeds
Instructions
- Preheat. Preheat your grill to 350 degrees F for indirect cooking.
- Prep the rolls. Using a large bread knife, slice the rolls in half, separating the tops from the bottoms. Tear off a large piece of Reynolds Wrap Non-Stick Foil and place the bottom section of the rolls on the foil. Set aside the tops of the rolls.
- Make the sandwiches. Spread the cut side of the bottom rolls with whole grain mustard. Top with folded pieces of the sliced ham and a single layer of sliced cheese. Place the tops of the buns back onto the sandwiches.
- Top with honey butter and poppy seeds. Melt your butter in a small bowl and stir in the hot honey. Brush the tops of the sliders with the honey butter, letting the butter drip down the sides and into the cracks of the rolls. Sprinkle the tops of the rolls with the poppy seeds.
- Cook. Fold the long edges of the foil up and around the rolls, crimping the edges to make a foil pack. Place the wrapped rolls on the indirect heat side of the grill and close the lid. Let the sliders cook for 20 minutes.
- Finish grilling. Open the grill and use tongs to open up the top of the foil pack so you can see the tops of the buns. Close the lid again and let the buns toast for 5 minutes, or until they are golden brown and you can see the melty cheese on the sides of the sandwiches.
- Serve. To serve, slice the buns apart into individual sliders.
Nutrition
Nutrition information is automatically calculated, so should only be used as an approximation.


Watched your Youtube video about this. Thanks for sharing this recipe. This looks like something that you could make on the Grill or even in the oven. Since the alumnium foil is closed, seems like the oven would be a perfect place to make it — when it is rainy and bad outside.